Introduction
Embroidery is more than just a decorative technique; it’s an art form that allows for infinite creativity and expression. Designing your own embroidery patterns can be incredibly rewarding, whether you’re a hobbyist looking to personalize gifts or a professional aiming to create unique designs for clients. This blog provides a detailed guide on how to design embroidery patterns, covering everything from the basics of design principles to advanced techniques and tools.
1. Understanding Embroidery Design Basics
a. What is Embroidery Design?
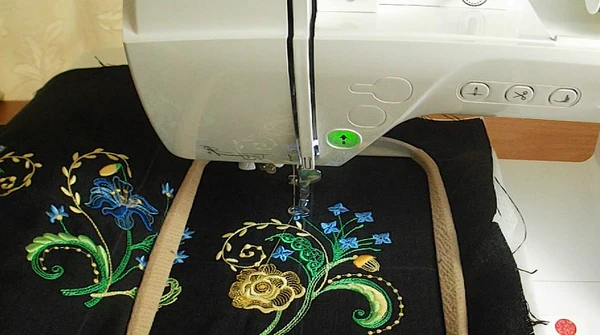
Embroidery design involves creating patterns that will be stitched onto fabric using various embroidery techniques. These designs can range from simple monograms to intricate, multi-colored artworks. The goal is to create a pattern that looks good and translates well into stitches.
b. Types of Embroidery Patterns
- Monograms: Custom initials or names.
- Floral Designs: Patterns featuring flowers and leaves.
- Geometric Patterns: Shapes and lines arranged in symmetrical or asymmetrical layouts.
- Themed Patterns: Designs based on specific themes, such as holidays, animals, or abstract art.
c. Key Design Elements
- Line: Defines the shape and form of the pattern.
- Shape: The basic geometric or organic forms used in the design.
- Color: The choice of colors that can make or break the visual impact of the design.
- Texture: The effect of different stitch types on the design’s appearance.
2. Tools and Software for Designing Embroidery Patterns
a. Traditional Tools
- Sketchpad and Pencil: For initial design drafts.
- Fabric Swatches: To test how designs will look on different fabrics.
- Embroidery Hoops: To hold fabric taut while stitching.
b. Digital Tools
- Embroidery Software: Programs like Adobe Illustrator, CorelDRAW, and dedicated embroidery software such as PE Design, Hatch, or Wilcom.
- Graphic Tablets: Useful for drawing directly into design software.
- Digitizing Software: Converts vector designs into embroidery files (e.g., .pes, .dst).
c. Choosing the Right Software
When selecting software for embroidery design, consider factors such as ease of use, features, compatibility with your embroidery machine, and budget. For beginners, user-friendly software with basic functionalities may be sufficient, while professionals may require advanced tools and features.
3. The Design Process: From Concept to Creation
a. Conceptualizing Your Design
- Inspiration: Gather ideas from various sources such as nature, art, or personal interests. Create a mood board if necessary.
- Sketching: Start with rough sketches to explore different ideas and compositions. Focus on the overall layout and key elements.
b. Creating a Digital Draft
- Scanning and Importing: Scan your sketches and import them into your design software.
- Vectorization: Trace your sketches using vector tools to create clean, scalable lines and shapes.
- Refinement: Adjust details, alignments, and proportions. Experiment with colors and textures.
c. Digitizing the Design
- Setting Up the File: Choose the appropriate file format based on your embroidery machine (e.g., .pes, .dst).
- Stitch Types: Define the stitch types (e.g., satin stitch, fill stitch) and settings for your design.
- Testing: Run test stitches on similar fabric to evaluate how the design translates into stitches. Make adjustments as needed.
4. Advanced Techniques and Tips
a. Working with Different Fabrics
- Fabric Choice: Consider the type of fabric you will be using. Different fabrics may require different stabilizers and stitch settings.
- Stabilizers: Use stabilizers to prevent fabric distortion and ensure a smooth stitching process. Common types include tear-away, cut-away, and wash-away stabilizers.
b. Color Management
- Thread Selection: Choose high-quality threads that match your color scheme and are compatible with your fabric.
- Color Blending: Experiment with color gradients and blends to add depth and dimension to your design.
- Thread Tension: Adjust the tension settings on your embroidery machine to ensure that threads lay flat and evenly.
c. Enhancing Your Design
- Layering: Add layers of stitches to create texture and interest. Techniques such as appliqué and embroidery layering can enhance the design’s complexity.
- Embellishments: Consider adding beads, sequins, or other embellishments for extra flair.
5. Common Challenges and Solutions
a. Thread Breaking
- Causes: Thread breakage can occur due to incorrect tension, poor-quality thread, or needle issues.
- Solutions: Check and adjust thread tension, use high-quality threads, and ensure the needle is appropriate for your fabric.
b. Design Shifting
- Causes: Design shifting can happen if the fabric is not properly stabilized or hooped.
- Solutions: Use the correct stabilizer, hoop the fabric tightly, and ensure proper alignment before stitching.
c. Color Bleeding
- Causes: Color bleeding can occur when threads bleed into adjacent areas or when washed.
- Solutions: Pre-wash fabrics and threads if necessary, and use color-fast threads to prevent bleeding.
6. Creating Custom Designs for Different Applications
a. Personalized Gifts
- Monograms: Design custom monograms for towels, shirts, or blankets.
- Unique Patterns: Create unique patterns that reflect the recipient’s interests or preferences.
b. Home Décor
- Throw Pillows: Design patterns for decorative throw pillows.
- Table Linens: Create designs for tablecloths, napkins, or placemats.
c. Apparel
- Clothing Embellishments: Add custom designs to jackets, shirts, or hats.
- Embroidery Patches: Design patches that can be sewn onto or ironed onto clothing items.
7. Best Practices for Successful Embroidery Design
a. Stay Organized
- File Management: Keep your design files organized in folders with clear naming conventions.
- Documentation: Document design settings and stitch types for future reference.
b. Continuous Learning
- Workshops and Courses: Participate in workshops or online courses to keep up with new techniques and trends.
- Community Engagement: Join embroidery forums or groups to share knowledge and gain feedback.
c. Experiment and Innovate
- Try New Techniques: Don’t be afraid to experiment with new stitches, fabrics, or techniques.
- Seek Feedback: Share your designs with others to get constructive feedback and suggestions.
8. Resources for Further Learning
a. Online Tutorials
- YouTube Channels: Many embroidery enthusiasts and professionals share tutorials on platforms like YouTube.
- Blogs and Forums: Follow blogs and forums dedicated to embroidery for tips, tutorials, and design ideas.
b. Books and Guides
- Embroidery Books: Explore books that offer in-depth tutorials and design inspiration.
- User Manuals: Refer to the user manuals of your embroidery software and machine for detailed instructions.
c. Professional Organizations
- Embroidery Associations: Join professional organizations such as the Embroidery Trade Association (ETA) for networking and resources.
- Trade Shows: Attend embroidery trade shows to discover new tools, materials, and techniques.
Conclusion
Designing embroidery patterns is a creative and fulfilling process that combines artistic vision with technical skill. By understanding the basics of design, utilizing the right tools and software, and mastering advanced techniques, you can create stunning and personalized embroidery designs that stand out. Whether you’re designing for personal use or professional projects, this comprehensive guide provides the foundation you need to bring your embroidery ideas to life.
Embark on your embroidery design journey with confidence and creativity. Experiment, learn, and enjoy the process of turning your artistic concepts into beautiful stitched creations.


